
 docker介绍

# Docker 简介
Docker 两个主要部件:
- Docker: 开源的容器虚拟化平台
- Docker Hub: 用于分享、管理 Docker 容器的 Docker SaaS 平台 – Docker Hub
Docker 使用客户端-服务器 (C/S) 架构模式。Docker 客户端会与 Docker 守护进程进行通信。Docker 守护进程会处理复杂繁重的任务,例如建立、运行、发布你的 Docker 容器。Docker 客户端和守护进程可以运行在同一个系统上,当然你也可以使用 Docker 客户端去连接一个远程的 Docker 守护进程。Docker 客户端和守护进程之间通过 socket 或者 RESTful API 进行通信。
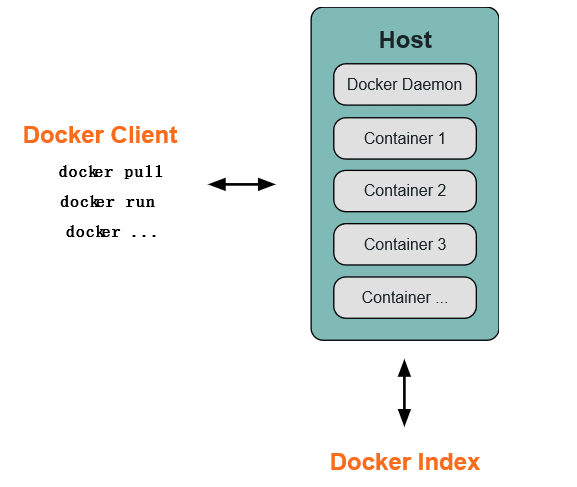
# Docker 守护进程
如上图所示,Docker 守护进程运行在一台主机上。用户并不直接和守护进程进行交互,而是通过 Docker 客户端间接和其通信。
# Docker 客户端
Docker 客户端,实际上是 docker 的二进制程序,是主要的用户与 Docker 交互方式。它接收用户指令并且与背后的 Docker 守护进程通信,如此来回往复。
# Docker 内部
要理解 Docker 内部构建,需要理解以下三种部件:
- Docker 镜像 - Docker images
- Docker 仓库 - Docker registeries
- Docker 容器 - Docker containers
# Docker 镜像
Docker 镜像是 Docker 容器运行时的只读模板,每一个镜像由一系列的层 (layers) 组成。Docker 使用 UnionFS 来将这些层联合到单独的镜像中。UnionFS 允许独立文件系统中的文件和文件夹(称之为分支)被透明覆盖,形成一个单独连贯的文件系统。正因为有了这些层的存在,Docker 是如此的轻量。当你改变了一个 Docker 镜像,比如升级到某个程序到新的版本,一个新的层会被创建。因此,不用替换整个原先的镜像或者重新建立(在使用虚拟机的时候你可能会这么做),只是一个新的层被添加或升级了。现在你不用重新发布整个镜像,只需要升级,层使得分发 Docker 镜像变得简单和快速。
# Docker 仓库
Docker 仓库用来保存镜像,可以理解为代码控制中的代码仓库。同样的,Docker 仓库也有公有和私有的概念。公有的 Docker 仓库名字是 Docker Hub。Docker Hub 提供了庞大的镜像集合供使用。这些镜像可以是自己创建,或者在别人的镜像基础上创建。Docker 仓库是 Docker 的分发部分。
# Docker 容器
Docker 容器和文件夹很类似,一个Docker容器包含了所有的某个应用运行所需要的环境。每一个 Docker 容器都是从 Docker 镜像创建的。Docker 容器可以运行、开始、停止、移动和删除。每一个 Docker 容器都是独立和安全的应用平台,Docker 容器是 Docker 的运行部分。
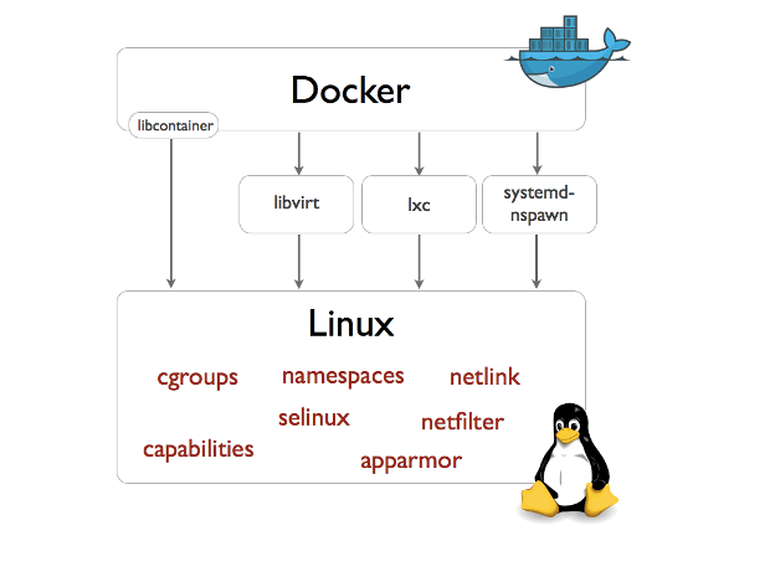
# libcontainer
Docker 从 0.9 版本开始使用 libcontainer 替代 lxc,libcontainer 和 Linux 系统的交互图如下:
# 命名空间「Namespaces」
# pid namespace
不同用户的进程就是通过 pid namespace 隔离开的,且不同 namespace 中可以有相同 PID。具有以下特征:
每个 namespace 中的 pid 是有自己的 pid=1 的进程(类似 /sbin/init 进程) 每个 namespace 中的进程只能影响自己的同一个 namespace 或子 namespace 中的进程 因为 /proc 包含正在运行的进程,因此在 container 中的 pseudo-filesystem 的 /proc 目录只能看到自己 namespace 中的进程 因为 namespace 允许嵌套,父 namespace 可以影响子 namespace 的进程,所以子 namespace 的进程可以在父 namespace 中看到,但是具有不同的 pid
参考文档:Introduction to Linux namespaces – Part 3: PID (opens new window)
# mnt namespace
类似 chroot,将一个进程放到一个特定的目录执行。mnt namespace 允许不同 namespace 的进程看到的文件结构不同,这样每个 namespace 中的进程所看到的文件目录就被隔离开了。同 chroot 不同,每个 namespace 中的 container 在 /proc/mounts 的信息只包含所在 namespace 的 mount point。
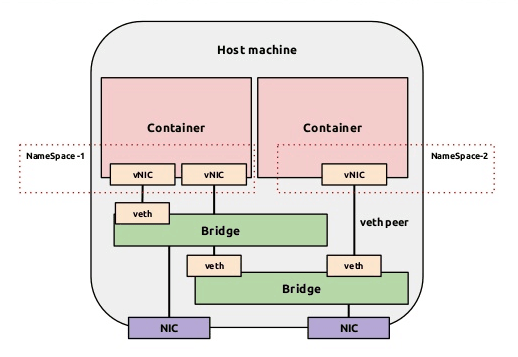
# net namespace
网络隔离是通过 net namespace 实现的, 每个 net namespace 有独立的 network devices, IP addresses, IP routing tables, /proc/net 目录。这样每个 container 的网络就能隔离开来。 docker 默认采用 veth 的方式将 container 中的虚拟网卡同 host 上的一个 docker bridge 连接在一起。
参考文档:Introduction to Linux namespaces – Part 5: NET (opens new window)
# uts namespace
UTS (“UNIX Time-sharing System”) namespace 允许每个 container 拥有独立的 hostname 和 domain name, 使其在网络上可以被视作一个独立的节点而非 Host 上的一个进程。
参考文档:Introduction to Linux namespaces – Part 1: UTS (opens new window)
# ipc namespace
container 中进程交互还是采用 Linux 常见的进程间交互方法 (interprocess communication - IPC), 包括常见的信号量、消息队列和共享内存。然而同 VM 不同,container 的进程间交互实际上还是 host 上具有相同 pid namespace 中的进程间交互,因此需要在 IPC 资源申请时加入 namespace 信息 - 每个 IPC 资源有一个唯一的 32bit ID。
参考文档:Introduction to Linux namespaces – Part 2: IPC (opens new window)
# user namespace
每个 container 可以有不同的 user 和 group id, 也就是说可以以 container 内部的用户在 container 内部执行程序而非 Host 上的用户。
有了以上 6 种 namespace 从进程、网络、IPC、文件系统、UTS 和用户角度的隔离,一个 container 就可以对外展现出一个独立计算机的能力,并且不同 container 从 OS 层面实现了隔离。 然而不同 namespace 之间资源还是相互竞争的,仍然需要类似 ulimit 来管理每个 container 所能使用的资源 - cgroup。
# Reference
Docker Getting Start: Related Knowledge (opens new window)
Docker 介绍以及其相关术语、底层原理和技术 (opens new window)
# 资源配额「cgroups」
cgroups 实现了对资源的配额和度量。 cgroups 的使用非常简单,提供类似文件的接口,在 /cgroup 目录下新建一个文件夹即可新建一个 group,在此文件夹中新建 task 文件,并将 pid 写入该文件,即可实现对该进程的资源控制。具体的资源配置选项可以在该文件夹中新建子 subsystem ,{子系统前缀}.{资源项} 是典型的配置方法, 如 memory.usage_in_bytes 就定义了该 group 在 subsystem memory 中的一个内存限制选项。 另外,cgroups 中的 subsystem 可以随意组合,一个 subsystem 可以在不同的 group 中,也可以一个 group 包含多个 subsystem - 也就是说一个 subsystem。
memory 内存相关的限制
cpu 在 cgroup 中,并不能像硬件虚拟化方案一样能够定义 CPU 能力,但是能够定义 CPU 轮转的优先级,因此具有较高 CPU 优先级的进程会更可能得到 CPU 运算。 通过将参数写入 cpu.shares ,即可定义改 cgroup 的 CPU 优先级 - 这里是一个相对权重,而非绝对值
blkio block IO 相关的统计和限制,byte/operation 统计和限制 (IOPS 等),读写速度限制等,但是这里主要统计的都是同步 IO
devices 设备权限限制
参考文档:how to use cgroup (opens new window)
# Docker 安装
docker 的相关安装方法这里不作介绍,具体安装参考官档 (opens new window)
# 获取当前 docker 版本
sudo docker version
Client version: 1.3.2
Client API version: 1.15
Go version (client): go1.3.3
Git commit (client): 39fa2fa/1.3.2
OS/Arch (client): linux/amd64
Server version: 1.3.2
Server API version: 1.15
Go version (server): go1.3.3
Git commit (server): 39fa2fa/1.3.2
2
3
4
5
6
7
8
9
10
# Docker 基础用法
Docker HUB (opens new window) : Docker镜像首页,包括官方镜像和其它公开镜像
因为国情的原因,国内下载 Docker HUB 官方的相关镜像比较慢,可以使用 Daocloud 镜像加速。
# Search images
sudo docker search ubuntu
# Pull images
sudo docker pull ubuntu # 获取 ubuntu 官方镜像
sudo docker images # 查看当前镜像列表
2
# Running an interactive shell
sudo docker run -i -t ubuntu:14.04 /bin/bash
- docker run - 运行一个容器
- -t - 分配一个(伪)tty (link is external)
- -i - 交互模式 (so we can interact with it)
- ubuntu:14.04 - 使用 ubuntu 基础镜像 14.04
- /bin/bash - 运行命令 bash shell
注: ubuntu 会有多个版本,通过指定 tag 来启动特定的版本 [image]:[tag]
sudo docker ps # 查看当前运行的容器, ps -a 列出当前系统所有的容器
CONTAINER ID        IMAGE               COMMAND             CREATED             STATUS              PORTS               NAMES
6c9129e9df10        ubuntu:14.04        /bin/bash           6 minutes ago       Up 6 minutes                            cranky_babbage
2
3
# 相关快捷键
- 退出:Ctrl-D or exit
- detach:Ctrl-P + Ctrl-Q
- attach: docker attach CONTAINER-ID
# Docker 命令帮助
# docker help
# docker command
sudo docker   # docker 命令帮助

Commands:
    attach    Attach to a running container                 # 当前 shell 下 attach 连接指定运行镜像
    build     Build an image from a Dockerfile              # 通过 Dockerfile 定制镜像
    commit    Create a new image from a container's changes # 提交当前容器为新的镜像
    cp        Copy files/folders from the containers filesystem to the host path
              # 从容器中拷贝指定文件或者目录到宿主机中
    create    Create a new container                        # 创建一个新的容器,同 run,但不启动容器
    diff      Inspect changes on a container's filesystem   # 查看 docker 容器变化
    events    Get real time events from the server          # 从 docker 服务获取容器实时事件
    exec      Run a command in an existing container        # 在已存在的容器上运行命令
    export    Stream the contents of a container as a tar archive
              # 导出容器的内容流作为一个 tar 归档文件[对应 import ]
    history   Show the history of an image                  # 展示一个镜像形成历史
    images    List images                                   # 列出系统当前镜像
    import    Create a new filesystem image from the contents of a tarball
              # 从tar包中的内容创建一个新的文件系统映像[对应 export]
    info      Display system-wide information               # 显示系统相关信息
    inspect   Return low-level information on a container   # 查看容器详细信息
    kill      Kill a running container                      # kill 指定 docker 容器
    load      Load an image from a tar archive              # 从一个 tar 包中加载一个镜像[对应 save]
    login     Register or Login to the docker registry server
              # 注册或者登陆一个 docker 源服务器
    logout    Log out from a Docker registry server         # 从当前 Docker registry 退出
    logs      Fetch the logs of a container                 # 输出当前容器日志信息
    port      Lookup the public-facing port which is NAT-ed to PRIVATE_PORT
              # 查看映射端口对应的容器内部源端口
    pause     Pause all processes within a container        # 暂停容器
    ps        List containers                               # 列出容器列表
    pull      Pull an image or a repository from the docker registry server
              # 从docker镜像源服务器拉取指定镜像或者库镜像
    push      Push an image or a repository to the docker registry server
              # 推送指定镜像或者库镜像至docker源服务器
    restart   Restart a running container                   # 重启运行的容器
    rm        Remove one or more containers                 # 移除一个或者多个容器
    rmi       Remove one or more images
              # 移除一个或多个镜像[无容器使用该镜像才可删除,否则需删除相关容器才可继续或 -f 强制删除]
    run       Run a command in a new container
              # 创建一个新的容器并运行一个命令
    save      Save an image to a tar archive                # 保存一个镜像为一个 tar 包[对应 load]
    search    Search for an image on the Docker Hub         # 在 docker hub 中搜索镜像
    start     Start a stopped containers                    # 启动容器
    stop      Stop a running containers                     # 停止容器
    tag       Tag an image into a repository                # 给源中镜像打标签
    top       Lookup the running processes of a container   # 查看容器中运行的进程信息
    unpause   Unpause a paused container                    # 取消暂停容器
    version   Show the docker version information           # 查看 docker 版本号
    wait      Block until a container stops, then print its exit code
              # 截取容器停止时的退出状态值
Run 'docker COMMAND --help' for more information on a command.
2
3
4
5
6
7
8
9
10
11
12
13
14
15
16
17
18
19
20
21
22
23
24
25
26
27
28
29
30
31
32
33
34
35
36
37
38
39
40
41
42
43
44
45
46
47
48
49
50
51
# docker option
Usage of docker:
  --api-enable-cors=false                Enable CORS headers in the remote API                      # 远程 API 中开启 CORS 头
  -b, --bridge=""                        Attach containers to a pre-existing network bridge         # 桥接网络
                                           use 'none' to disable container networking
  --bip=""                               Use this CIDR notation address for the network bridge's IP, not compatible with -b
                                         # 和 -b 选项不兼容,具体没有测试过
  -d, --daemon=false                     Enable daemon mode                                         # daemon 模式
  -D, --debug=false                      Enable debug mode                                          # debug 模式
  --dns=[]                               Force docker to use specific DNS servers                   # 强制 docker 使用指定 dns 服务器
  --dns-search=[]                        Force Docker to use specific DNS search domains            # 强制 docker 使用指定 dns 搜索域
  -e, --exec-driver="native"             Force the docker runtime to use a specific exec driver     # 强制 docker 运行时使用指定执行驱动器
  --fixed-cidr=""                        IPv4 subnet for fixed IPs (ex: 10.20.0.0/16)
                                           this subnet must be nested in the bridge subnet (which is defined by -b or --bip)
  -G, --group="docker"                   Group to assign the unix socket specified by -H when running in daemon mode
                                           use '' (the empty string) to disable setting of a group
  -g, --graph="/var/lib/docker"          Path to use as the root of the docker runtime              # 容器运行的根目录路径
  -H, --host=[]                          The socket(s) to bind to in daemon mode                    # daemon 模式下 docker 指定绑定方式[tcp or 本地 socket]
                                           specified using one or more tcp://host:port, unix:///path/to/socket, fd://* or fd://socketfd.
  --icc=true                             Enable inter-container communication                       # 跨容器通信
  --insecure-registry=[]                 Enable insecure communication with specified registries (no certificate verification for HTTPS and enable HTTP fallback) (e.g., localhost:5000 or 10.20.0.0/16)
  --ip="0.0.0.0"                         Default IP address to use when binding container ports     # 指定监听地址,默认所有 ip
  --ip-forward=true                      Enable net.ipv4.ip_forward                                 # 开启转发
  --ip-masq=true                         Enable IP masquerading for bridge's IP range
  --iptables=true                        Enable Docker's addition of iptables rules                 # 添加对应 iptables 规则
  --mtu=0                                Set the containers network MTU                             # 设置网络 mtu
                                           if no value is provided: default to the default route MTU or 1500 if no default route is available
  -p, --pidfile="/var/run/docker.pid"    Path to use for daemon PID file                            # 指定 pid 文件位置
  --registry-mirror=[]                   Specify a preferred Docker registry mirror
  -s, --storage-driver=""                Force the docker runtime to use a specific storage driver  # 强制 docker 运行时使用指定存储驱动
  --selinux-enabled=false                Enable selinux support                                     # 开启 selinux 支持
  --storage-opt=[]                       Set storage driver options                                 # 设置存储驱动选项
  --tls=false                            Use TLS; implied by tls-verify flags                       # 开启 tls
  --tlscacert="/root/.docker/ca.pem"     Trust only remotes providing a certificate signed by the CA given here
  --tlscert="/root/.docker/cert.pem"     Path to TLS certificate file                               # tls 证书文件位置
  --tlskey="/root/.docker/key.pem"       Path to TLS key file                                       # tls key 文件位置
  --tlsverify=false                      Use TLS and verify the remote (daemon: verify client, client: verify daemon) # 使用 tls 并确认远程控制主机
  -v, --version=false                    Print version information and quit                         # 输出 docker 版本信息
2
3
4
5
6
7
8
9
10
11
12
13
14
15
16
17
18
19
20
21
22
23
24
25
26
27
28
29
30
31
32
33
34
35
36
37
# docker search
sudo docker search --help

Usage: docker search TERM

Search the Docker Hub for images     # 从 Docker Hub 搜索镜像

  --automated=false    Only show automated builds
  --no-trunc=false     Don't truncate output
  -s, --stars=0        Only displays with at least xxx stars
2
3
4
5
6
7
8
9
示例:
sudo docker search -s 100 ubuntu
# 查找 star 数至少为 100 的镜像,找出只有官方镜像 start 数超过 100,默认不加 s 选项找出所有相关 ubuntu 镜像
NAME      DESCRIPTION                  STARS     OFFICIAL   AUTOMATED
ubuntu    Official Ubuntu base image   425       [OK]
2
3
4
# docker info
sudo docker info
Containers: 1                       # 容器个数
Images: 22                          # 镜像个数
Storage Driver: devicemapper        # 存储驱动
 Pool Name: docker-8:17-3221225728-pool
 Pool Blocksize: 65.54 kB
 Data file: /data/docker/devicemapper/devicemapper/data
 Metadata file: /data/docker/devicemapper/devicemapper/metadata
 Data Space Used: 1.83 GB
 Data Space Total: 107.4 GB
 Metadata Space Used: 2.191 MB
 Metadata Space Total: 2.147 GB
 Library Version: 1.02.84-RHEL7 (2014-03-26)
Execution Driver: native-0.2        # 存储驱动
Kernel Version: 3.10.0-123.el7.x86_64
Operating System: CentOS Linux 7 (Core)
2
3
4
5
6
7
8
9
10
11
12
13
14
15
16
# docker pull && docker push
sudo docker pull --help           # pull 拉取镜像

Usage: docker pull [OPTIONS] NAME[:TAG]

Pull an image or a repository from the registry

  -a, --all-tags=false    Download all tagged images in the repository

sudo docker push                  # push 推送指定镜像

Usage: docker push NAME[:TAG]

Push an image or a repository to the registry
2
3
4
5
6
7
8
9
10
11
12
13
示例:
sudo docker pull ubuntu           # 下载官方 ubuntu docker 镜像,默认下载所有 ubuntu 官方库镜像
sudo docker pull ubuntu:14.04     # 下载指定版本 ubuntu 官方镜像
2
sudo docker push 192.168.0.100:5000/ubuntu
# 推送镜像库到私有源[可注册 docker 官方账户,推送到官方自有账户]
sudo docker push 192.168.0.100:5000/ubuntu:14.04
# 推送指定镜像到私有源
2
3
4
# docker images
# 列出当前系统镜像
sudo docker images --help

Usage: docker images [OPTIONS] [NAME]

List images

  -a, --all=false      Show all images (by default filter out the intermediate image layers)
  # -a 显示当前系统的所有镜像,包括过渡层镜像,默认 docker images 显示最终镜像,不包括过渡层镜像
  -f, --filter=[]      Provide filter values (i.e. 'dangling=true')
  --no-trunc=false     Don't truncate output
  -q, --quiet=false    Only show numeric IDs
2
3
4
5
6
7
8
9
10
11
示例:
sudo docker images            # 显示当前系统镜像,不包括过渡层镜像
sudo docker images -a         # 显示当前系统所有镜像,包括过渡层镜像
sudo docker images ubuntu     # 显示当前系统 docker ubuntu 库中的所有镜像
REPOSITORY                 TAG                 IMAGE ID            CREATED             VIRTUAL SIZE
ubuntu                     12.04               ebe4be4dd427        4 weeks ago         210.6 MB
ubuntu                     14.04               e54ca5efa2e9        4 weeks ago         276.5 MB
ubuntu                     14.04-ssh           6334d3ac099a        7 weeks ago         383.2 MB
2
3
4
5
6
7
# docker rmi
删除一个或者多个镜像
sudo docker rmi --help

Usage: docker rmi IMAGE [IMAGE...]

Remove one or more images

  -f, --force=false    Force removal of the image       # 强制移除镜像不管是否有容器使用该镜像
  --no-prune=false     Do not delete untagged parents   # 不要删除未标记的父镜像
2
3
4
5
6
7
8
# docker run
sudo docker run --help

Usage: docker run [OPTIONS] IMAGE [COMMAND] [ARG...]

Run a command in a new container

  -a, --attach=[]            Attach to stdin, stdout or stderr.
  -c, --cpu-shares=0         CPU shares (relative weight)                       # 设置 cpu 使用权重
  --cap-add=[]               Add Linux capabilities
  --cap-drop=[]              Drop Linux capabilities
  --cidfile=""               Write the container ID to the file                 # 把容器 id 写入到指定文件
  --cpuset=""                CPUs in which to allow execution (0-3, 0,1)        # cpu 绑定
  -d, --detach=false         Detached mode: Run container in the background, print new container id # 后台运行容器
  --device=[]                Add a host device to the container (e.g. --device=/dev/sdc:/dev/xvdc)
  --dns=[]                   Set custom dns servers                             # 设置 dns
  --dns-search=[]            Set custom dns search domains                      # 设置 dns 域搜索
  -e, --env=[]               Set environment variables                          # 定义环境变量
  --entrypoint=""            Overwrite the default entrypoint of the image      # ?
  --env-file=[]              Read in a line delimited file of ENV variables     # 从指定文件读取变量值
  --expose=[]                Expose a port from the container without publishing it to your host    # 指定对外提供服务端口
  -h, --hostname=""          Container host name                                # 设置容器主机名
  -i, --interactive=false    Keep stdin open even if not attached               # 保持标准输出开启即使没有 attached
  --link=[]                  Add link to another container (name:alias)         # 添加链接到另外一个容器
  --lxc-conf=[]              (lxc exec-driver only) Add custom lxc options --lxc-conf="lxc.cgroup.cpuset.cpus = 0,1"
  -m, --memory=""            Memory limit (format: <number><optional unit>, where unit = b, k, m or g) # 内存限制
  --name=""                  Assign a name to the container                     # 设置容器名
  --net="bridge"             Set the Network mode for the container             # 设置容器网络模式
                               'bridge': creates a new network stack for the container on the docker bridge
                               'none': no networking for this container
                               'container:<name|id>': reuses another container network stack
                               'host': use the host network stack inside the container.  Note: the host mode gives the container full access to local system services such as D-bus and is therefore considered insecure.
  -P, --publish-all=false    Publish all exposed ports to the host interfaces   # 自动映射容器对外提供服务的端口
  -p, --publish=[]           Publish a container's port to the host             # 指定端口映射
                               format: ip:hostPort:containerPort | ip::containerPort | hostPort:containerPort
                               (use 'docker port' to see the actual mapping)
  --privileged=false         Give extended privileges to this container         # 提供更多的权限给容器
  --restart=""               Restart policy to apply when a container exits (no, on-failure[:max-retry], always)
  --rm=false                 Automatically remove the container when it exits (incompatible with -d) # 如果容器退出自动移除和 -d 选项冲突
  --security-opt=[]          Security Options
  --sig-proxy=true           Proxify received signals to the process (even in non-tty mode). SIGCHLD is not proxied.
  -t, --tty=false            Allocate a pseudo-tty                              # 分配伪终端
  -u, --user=""              Username or UID                                    # 指定运行容器的用户 uid 或者用户名
  -v, --volume=[]            Bind mount a volume (e.g., from the host: -v /host:/container, from docker: -v /container)
                             # 挂载卷
  --volumes-from=[]          Mount volumes from the specified container(s)      # 从指定容器挂载卷
  -w, --workdir=""           Working directory inside the container             # 指定容器工作目录
2
3
4
5
6
7
8
9
10
11
12
13
14
15
16
17
18
19
20
21
22
23
24
25
26
27
28
29
30
31
32
33
34
35
36
37
38
39
40
41
42
43
44
45
46
示例:
sudo docker images ubuntu
REPOSITORY          TAG                 IMAGE ID            CREATED             VIRTUAL SIZE
ubuntu              14.04               e54ca5efa2e9        4 weeks ago         276.5 MB
... ...
sudo docker run -t -i -c 100 -m 512MB -h test1 -d --name="docker_test1" ubuntu /bin/bash
# 创建一个 cpu 优先级为 100,内存限制 512MB,主机名为 test1,名为 docker_test1 后台运行 bash 的容器
a424ca613c9f2247cd3ede95adfbaf8d28400cbcb1d5f9b69a7b56f97b2b52e5
sudo docker ps
CONTAINER ID        IMAGE           COMMAND         CREATED             STATUS              PORTS       NAMES
a424ca613c9f        ubuntu:14.04    /bin/bash       6 seconds ago       Up 5 seconds                    docker_test1
sudo docker attach docker_test1
root@test1:/# pwd
/
root@test1:/# exit
exit
2
3
4
5
6
7
8
9
10
11
12
13
14
15
# 关于cpu优先级
By default all groups have 1024 shares. A group with 100 shares will get a ~10% portion of the CPU time - archlinux cgroups
# docker start|stop|kill… …
docker start CONTAINER [CONTAINER…]
# 运行一个或多个停止的容器
docker stop CONTAINER [CONTAINER…]
# 停掉一个或多个运行的容器 -t 选项可指定超时时间
docker kill [OPTIONS] CONTAINER [CONTAINER…]
# 默认 kill 发送 SIGKILL 信号 -s 可以指定发送 kill 信号类型
docker restart [OPTIONS] CONTAINER [CONTAINER…]
# 重启一个或多个运行的容器 -t 选项可指定超时时间
docker pause CONTAINER
# 暂停一个容器,方便 commit
docker unpause CONTAINER
# 继续暂停的容器
docker rm [OPTIONS] CONTAINER [CONTAINER…]
# 移除一个或多个容器
-f, –force=false Force removal of running container
-l, –link=false Remove the specified link and not the underlying container
-v, –volumes=false Remove the volumes associated with the container
docker commit [OPTIONS] CONTAINER [REPOSITORY[:TAG]]
# 提交指定容器为镜像
-a, –author=”” Author (e.g., “John Hannibal Smith hannibal@a-team.com”)
-m, –message=”” Commit message
-p, –pause=true Pause container during commit
# 默认 commit 是暂停状态
docker inspect CONTAINER|IMAGE [CONTAINER|IMAGE…]
# 查看容器或者镜像的详细信息
docker logs CONTAINER
# 输出指定容器日志信息
-f, –follow=false Follow log output
# 类似 tail -f
-t, –timestamps=false Show timestamps
–tail=”all” Output the specified number of lines at the end of logs (defaults to all logs)
2
3
4
5
6
7
8
9
10
11
12
13
14
15
16
17
18
19
20
21
22
23
24
25
26
27
28
29
30
31
参考文档:Docker Run Reference (opens new window)
# Docker 1.3 新增特性和命令
# Digital Signature Verification
Docker 1.3 版本将使用数字签名自动验证所有官方库的来源和完整性,如果一个官方镜像被篡改或者被破坏,目前 Docker 只会对这种情况发出警告而并不阻止容器的运行。
Inject new processes with docker exec
docker exec --help

Usage: docker exec [OPTIONS] CONTAINER COMMAND [ARG...]

Run a command in an existing container

  -d, --detach=false         Detached mode: run command in the background
  -i, --interactive=false    Keep STDIN open even if not attached
  -t, --tty=false            Allocate a pseudo-TTY
2
3
4
5
6
7
8
9
为了简化调试,可以使用 docker exec 命令通过 Docker API 和 CLI 在运行的容器上运行程序。
docker exec -it ubuntu_bash bash
上例将在容器 ubuntu_bash 中创建一个新的 Bash 会话。
Tune container lifecycles with docker create
我们可以通过docker run <image name>命令创建一个容器并运行其中的程序,因为有很多用户要求创建容器的时候不启动容器,所以docker create应运而生了。
docker create -t -i fedora bash
6d8af538ec541dd581ebc2a24153a28329acb5268abe5ef868c1f1a261221752
2
上例创建了一个可写的容器层 (并且打印出容器 ID),但是并不运行它,可以使用以下命令运行该容器:
docker start -a -i 6d8af538ec5
bash-4.2#
Security Options
2
3
通过--security-opt选项,运行容器时用户可自定义 SELinux 和 AppArmor 卷标和配置。
docker run --security-opt label:type:svirt_apache -i -t centos \ bash
上例只允许容器监听在 Apache 端口,这个选项的好处是用户不需要运行 docker 的时候指定--privileged选项,降低安全风险。
参考文档:Docker 1.3: signed images, process injection, security options, Mac shared directories
# Docker 1.5 新特性
参考文档:Docker 1.5 新特性 (opens new window)
# Docker 端口映射
# Find IP address of container with ID <container_id> 通过容器 id 获取 ip
sudo docker inspect <container_id> | grep IPAddress | cut -d ’"’ -f 4
2
无论如何,这些 ip 是基于本地系统的并且容器的端口非本地主机是访问不到的。此外,除了端口只能本地访问外,对于容器的另外一个问题是这些 ip 在容器每次启动的时候都会改变。
Docker 解决了容器的这两个问题,并且给容器内部服务的访问提供了一个简单而可靠的方法。Docker 通过端口绑定主机系统的接口,允许非本地客户端访问容器内部运行的服务。为了简便的使得容器间通信,Docker 提供了这种连接机制。
# 自动映射端口
-P使用时需要指定--expose选项,指定需要对外提供服务的端口
sudo docker run -t -P --expose 22 --name server ubuntu:14.04
使用docker run -P自动绑定所有对外提供服务的容器端口,映射的端口将会从没有使用的端口池中 (49000..49900) 自动选择,你可以通过docker ps、docker inspect <container_id>或者docker port <container_id> <port>确定具体的绑定信息。
# 绑定端口到指定接口
# 基本语法
sudo docker run -p [([<host_interface>:[host_port]])|(<host_port>):]<container_port>[/udp] <image> <cmd>
默认不指定绑定 ip 则监听所有网络接口。
# 绑定 TCP 端口
# Bind TCP port 8080 of the container to TCP port 80 on 127.0.0.1 of the host machine.
sudo docker run -p 127.0.0.1:80:8080 <image> <cmd>
# Bind TCP port 8080 of the container to a dynamically allocated TCP port on 127.0.0.1 of the host machine.
sudo docker run -p 127.0.0.1::8080 <image> <cmd>
# Bind TCP port 8080 of the container to TCP port 80 on all available interfaces of the host machine.
sudo docker run -p 80:8080 <image> <cmd>
# Bind TCP port 8080 of the container to a dynamically allocated TCP port on all available interfaces
sudo docker run -p 8080 <image> <cmd>
2
3
4
5
6
7
8
# 绑定 UDP 端口
# Bind UDP port 5353 of the container to UDP port 53 on 127.0.0.1 of the host machine.
sudo docker run -p 127.0.0.1:53:5353/udp <image> <cmd>
2
# Docker 网络配置
Dokcer 通过使用 Linux 桥接提供容器之间的通信,docker0 桥接接口的目的就是方便 Docker 管理。当 Docker daemon 启动时需要做以下操作:
creates the docker0 bridge if not present # 如果 docker0 不存在则创建
searches for an IP address range which doesn’t overlap with an existing route # 搜索一个与当前路由不冲突的 ip 段
picks an IP in the selected range # 在确定的范围中选择 ip
assigns this IP to the docker0 bridge # 绑定 ip 到 docker0
# Docker 四种网络模式
四种网络模式摘自Docker 网络详解及 pipework 源码解读与实践 (opens new window)
docker run 创建 Docker 容器时,可以用 –net 选项指定容器的网络模式,Docker 有以下 4 种网络模式:
- host 模式,使用 –net=host 指定。
- container 模式,使用 –net=container:NAME_or_ID 指定。
- none 模式,使用 –net=none 指定。
- bridge 模式,使用 –net=bridge 指定,默认设置。
- host 模式
如果启动容器的时候使用 host 模式,那么这个容器将不会获得一个独立的 Network Namespace,而是和宿主机共用一个 Network Namespace。容器将不会虚拟出自己的网卡,配置自己的 IP 等,而是使用宿主机的 IP 和端口。
例如,我们在 10.10.101.105/24 的机器上用 host 模式启动一个含有 web 应用的 Docker 容器,监听 tcp 80 端口。当我们在容器中执行任何类似 ifconfig 命令查看网络环境时,看到的都是宿主机上的信息。而外界访问容器中的应用,则直接使用 10.10.101.105:80 即可,不用任何 NAT 转换,就如直接跑在宿主机中一样。但是,容器的其他方面,如文件系统、进程列表等还是和宿主机隔离的。
# container 模式
这个模式指定新创建的容器和已经存在的一个容器共享一个 Network Namespace,而不是和宿主机共享。新创建的容器不会创建自己的网卡,配置自己的 IP,而是和一个指定的容器共享 IP、端口范围等。同样,两个容器除了网络方面,其他的如文件系统、进程列表等还是隔离的。两个容器的进程可以通过 lo 网卡设备通信。
# none模式
这个模式和前两个不同。在这种模式下,Docker 容器拥有自己的 Network Namespace,但是,并不为 Docker容器进行任何网络配置。也就是说,这个 Docker 容器没有网卡、IP、路由等信息。需要我们自己为 Docker 容器添加网卡、配置 IP 等。
# bridge模式
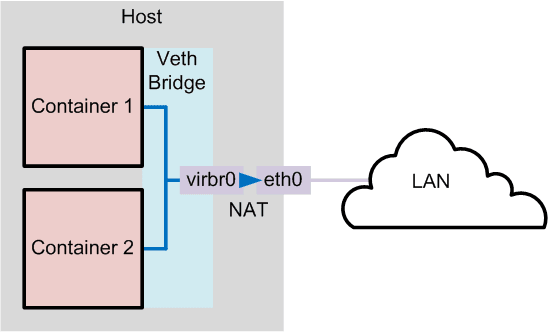
bridge 模式是 Docker 默认的网络设置,此模式会为每一个容器分配 Network Namespace、设置 IP 等,并将一个主机上的 Docker 容器连接到一个虚拟网桥上。当 Docker server 启动时,会在主机上创建一个名为 docker0 的虚拟网桥,此主机上启动的 Docker 容器会连接到这个虚拟网桥上。虚拟网桥的工作方式和物理交换机类似,这样主机上的所有容器就通过交换机连在了一个二层网络中。接下来就要为容器分配 IP 了,Docker 会从 RFC1918 所定义的私有 IP 网段中,选择一个和宿主机不同的IP地址和子网分配给 docker0,连接到 docker0 的容器就从这个子网中选择一个未占用的 IP 使用。如一般 Docker 会使用 172.17.0.0/16 这个网段,并将 172.17.42.1/16 分配给 docker0 网桥(在主机上使用 ifconfig 命令是可以看到 docker0 的,可以认为它是网桥的管理接口,在宿主机上作为一块虚拟网卡使用)
# 列出当前主机网桥
sudo brctl show  # brctl 工具依赖 bridge-utils 软件包
bridge name bridge id STP enabled interfaces
docker0 8000.000000000000 no
2
3
# 查看当前 docker0 ip
sudo ifconfig docker0
docker0 Link encap:Ethernet HWaddr xx:xx:xx:xx:xx:xx
inet addr:172.17.42.1 Bcast:0.0.0.0 Mask:255.255.0.0
在容器运行时,每个容器都会分配一个特定的虚拟机口并桥接到 docker0。每个容器都会配置同 docker0 ip 相同网段的专用 ip 地址,docker0 的 IP 地址被用于所有容器的默认网关。
2
3
4
# 运行一个容器
sudo docker run -t -i -d ubuntu /bin/bash
52f811c5d3d69edddefc75aff5a4525fc8ba8bcfa1818132f9dc7d4f7c7e78b4
sudo brctl show
bridge name bridge id STP enabled interfaces
docker0 8000.fef213db5a66 no vethQCDY1N
2
3
4
5
以上, docker0 扮演着 52f811c5d3d6 container 这个容器的虚拟接口 vethQCDY1N interface 桥接的角色。
# 使用特定范围的 IP
Docker 会尝试寻找没有被主机使用的 ip 段,尽管它适用于大多数情况下,但是它不是万能的,有时候我们还是需要对 ip 进一步规划。Docker 允许你管理 docker0 桥接或者通过 -b 选项自定义桥接网卡,需要安装 bridge-utils 软件包。
基本步骤如下:
- ensure Docker is stopped # 确保 docker 的进程是停止的
- create your own bridge (bridge0 for example) # 创建自定义网桥
- assign a specific IP to this bridge # 给网桥分配特定的 ip
- start Docker with the -b=bridge0 parameter # 以 -b 的方式指定网桥
# Stopping Docker and removing docker0

sudo service docker stop
sudo ip link set dev docker0 down
sudo brctl delbr docker0

# Create our own bridge

sudo brctl addbr bridge0
sudo ip addr add 192.168.5.1/24 dev bridge0
sudo ip link set dev bridge0 up

# Confirming that our bridge is up and running

ip addr show bridge0
4: bridge0: <BROADCAST,MULTICAST> mtu 1500 qdisc noop state UP group default
    link/ether 66:38:d0:0d:76:18 brd ff:ff:ff:ff:ff:ff
    inet 192.168.5.1/24 scope global bridge0
       valid_lft forever preferred_lft forever

# Tell Docker about it and restart (on Ubuntu)

echo 'DOCKER_OPTS="-b=bridge0"' >> /etc/default/docker
sudo service docker start
2
3
4
5
6
7
8
9
10
11
12
13
14
15
16
17
18
19
20
21
22
23
24
参考文档: Network Configuration (opens new window)
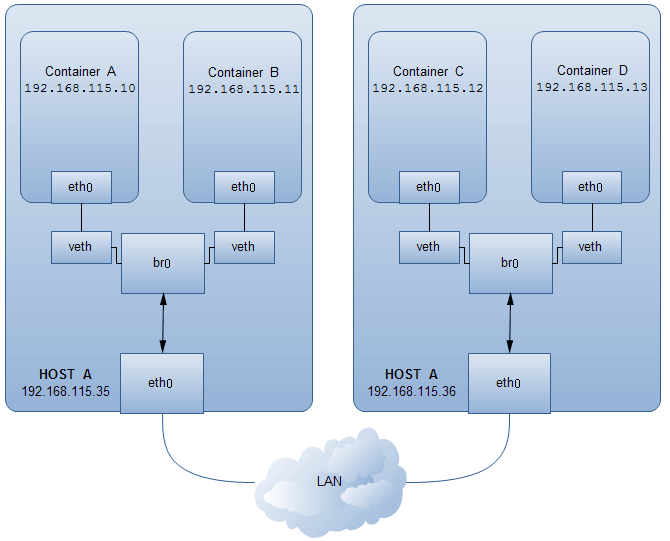
# 不同主机间容器通信
# 不同容器之间的通信可以借助于 pipework 这个工具:
git clone https://github.com/jpetazzo/pipework.git
sudo cp -rp pipework/pipework /usr/local/bin/
2
# 安装相应依赖软件
sudo apt-get install iputils-arping bridge-utils -y
# 桥接网络
桥接网络可以参考日常问题处理 Tips (opens new window)关于桥接的配置说明,这里不再赘述。
# brctl show
bridge name     bridge id               STP enabled     interfaces
br0             8000.000c291412cd       no              eth0
docker0         8000.56847afe9799       no              vetheb48029
2
3
4
可以删除 docker0,直接把 docker 的桥接指定为 br0。也可以保留使用默认的配置,这样单主机容器之间的通信可以通过 docker0,而跨主机不同容器之间通过 pipework 新建 docker 容器的网卡桥接到 br0,这样跨主机容器之间就可以通信了。
- ubuntu
sudo service docker stop
sudo ip link set dev docker0 down
sudo brctl delbr docker0
echo 'DOCKER_OPTS="-b=br0"' >> /etc/default/docker
sudo service docker start
2
3
4
5
- CentOS 7/RHEL 7
sudo systemctl stop docker
sudo ip link set dev docker0 down
sudo brctl delbr docker0
cat /etc/sysconfig/docker | grep 'OPTIONS='
OPTIONS=--selinux-enabled -b=br0 -H fd://
sudo systemctl start docker
2
3
4
5
6
pipework
不同容器之间的通信可以借助于 pipework 这个工具给 docker 容器新建虚拟网卡并绑定 IP 桥接到 br0
git clone https://github.com/jpetazzo/pipework.git
sudo cp -rp pipework/pipework /usr/local/bin/
pipework
Syntax:
pipework <hostinterface> [-i containerinterface] <guest> <ipaddr>/<subnet>[@default_gateway] [macaddr][@vlan]
pipework <hostinterface> [-i containerinterface] <guest> dhcp [macaddr][@vlan]
pipework --wait [-i containerinterface]
2
3
4
5
6
7
如果删除了默认的 docker0 桥接,把 docker 默认桥接指定到了 br0,则最好在创建容器的时候加上 --net=none,防止自动分配的 IP 在局域网中有冲突。
sudo docker run --rm -ti --net=none ubuntu:14.04 /bin/bash
root@a46657528059:/#
                 # Ctrl-P + Ctrl-Q 回到宿主机 shell,容器 detach 状态
sudo docker  ps
CONTAINER ID    IMAGE          COMMAND       CREATED         STATUS          PORTS      NAMES
a46657528059    ubuntu:14.04   "/bin/bash"   4 minutes ago   Up 4 minutes               hungry_lalande
sudo pipework br0 -i eth0 a46657528059 192.168.115.10/24@192.168.115.2
# 默认不指定网卡设备名,则默认添加为 eth1
# 另外 pipework 不能添加静态路由,如果有需求则可以在 run 的时候加上 --privileged=true 权限在容器中手动添加,
# 但这种安全性有缺陷,可以通过 ip netns 操作
sudo docker attach a46657528059
root@a46657528059:/# ifconfig eth0
eth0      Link encap:Ethernet  HWaddr 86:b6:6b:e8:2e:4d
          inet addr:192.168.115.10  Bcast:0.0.0.0  Mask:255.255.255.0
          inet6 addr: fe80::84b6:6bff:fee8:2e4d/64 Scope:Link
          UP BROADCAST RUNNING MULTICAST  MTU:1500  Metric:1
          RX packets:8 errors:0 dropped:0 overruns:0 frame:0
          TX packets:9 errors:0 dropped:0 overruns:0 carrier:0
          collisions:0 txqueuelen:1000
          RX bytes:648 (648.0 B)  TX bytes:690 (690.0 B)

root@a46657528059:/# route -n
Kernel IP routing table
Destination     Gateway         Genmask         Flags Metric Ref    Use Iface
0.0.0.0         192.168.115.2   0.0.0.0         UG    0      0        0 eth0
192.168.115.0   0.0.0.0         255.255.255.0   U     0      0        0 eth0
2
3
4
5
6
7
8
9
10
11
12
13
14
15
16
17
18
19
20
21
22
23
24
25
26
使用ip netns添加静态路由,避免创建容器使用--privileged=true选项造成一些不必要的安全问题:
docker inspect --format="{{ .State.Pid }}" a46657528059 # 获取指定容器 pid
6350
sudo ln -s /proc/6350/ns/net /var/run/netns/6350
sudo ip netns exec 6350 ip route add 192.168.0.0/16 dev eth0 via 192.168.115.2
sudo ip netns exec 6350 ip route    # 添加成功
192.168.0.0/16 via 192.168.115.2 dev eth0
... ...
2
3
4
5
6
7
在其它宿主机进行相应的配置,新建容器并使用 pipework 添加虚拟网卡桥接到 br0,测试通信情况即可。
另外,pipework 可以创建容器的 vlan 网络,这里不作过多的介绍了,官方文档已经写的很清楚了,可以查看以下两篇文章:
Pipework 官方文档 (opens new window) Docker 网络详解及 pipework 源码解读与实践 (opens new window)
# Dockerfile
Docker 可以通过 Dockerfile 的内容来自动构建镜像。Dockerfile 是一个包含创建镜像所有命令的文本文件,通过docker build命令可以根据 Dockerfile 的内容构建镜像,在介绍如何构建之前先介绍下 Dockerfile 的基本语法结构。
Dockerfile 有以下指令选项:
- FROM
- MAINTAINER
- RUN
- CMD
- EXPOSE
- ENV
- ADD
- COPY
- ENTRYPOINT
- VOLUME
- USER
- WORKDIR
- ONBUILD
# FROM
用法:
FROM <image>
或者
FROM <image>
FROM指定构建镜像的基础源镜像,如果本地没有指定的镜像,则会自动从 Docker 的公共库 pull 镜像下来。FROM必须是 Dockerfile 中非注释行的第一个指令,即一个 Dockerfile 从 FROM 语句开始。FROM 可以在一个 Dockerfile 中出现多次,如果有需求在一个 Dockerfile 中创建多个镜像。 如果 FROM 语句没有指定镜像标签,则默认使用latest`标签。
# MAINTAINER
用法:
MAINTAINER <name>
指定创建镜像的用户
# RUN 有两种使用方式
- RUN (the command is run in a shell - /bin/sh -c - shell form)
- RUN [“executable”, “param1”, “param2”] (exec form)
每条RUN指令将在当前镜像基础上执行指定命令,并提交为新的镜像,后续的RUN都在之前 RUN 提交后的镜像为基础,镜像是分层的,可以通过一个镜像的任何一个历史提交点来创建,类似源码的版本控制。
exec方式会被解析为一个 JSON 数组,所以必须使用双引号而不是单引号。exec 方式不会调用一个命令 shell,所以也就不会继承相应的变量,如:
RUN [ "echo", "$HOME" ]
这种方式是不会达到输出 HOME 变量的,正确的方式应该是这样的
RUN [ "sh", "-c", "echo", "$HOME" ]
RUN产生的缓存在下一次构建的时候是不会失效的,会被重用,可以使用--no-cache选项,即 docker build --no-cache,如此便不会缓存。
# CMD
CMD 有三种使用方式:
- CMD [“executable”,”param1”,”param2”] (exec form, this is the preferred form, 优先选择)
- CMD [“param1”,”param2”] (as default parameters to ENTRYPOINT)
- CMD command param1 param2 (shell form)
CMD 指定在 Dockerfile 中只能使用一次,如果有多个,则只有最后一个会生效。
CMD 的目的是为了在启动容器时提供一个默认的命令执行选项。如果用户启动容器时指定了运行的命令,则会覆盖掉 CMD 指定的命令。
CMD 会在启动容器的时候执行,build 时不执行,而 RUN 只是在构建镜像的时候执行,后续镜像构建完成之后,启动容器就与 RUN 无关了,这个初学者容易弄混这个概念,这里简单注解一下。
# EXPOSE
EXPOSE
# ENV
ENV <key> <value>       # 只能设置一个变量
ENV <key>=<value> ...   # 允许一次设置多个变量
2
指定一个环节变量,会被后续 RUN 指令使用,并在容器运行时保留。
例子:
ENV myName="John Doe" myDog=Rex\ The\ Dog \
    myCat=fluffy
2
等同于
ENV myName John Doe
ENV myDog Rex The Dog
ENV myCat fluffy
2
3
# ADD
ADD <src>... <dest>
ADD复制本地主机文件、目录或者远程文件 URLS 从
ADD hom* /mydir/        # adds all files starting with "hom"
ADD hom?.txt /mydir/    # ? is replaced with any single character
2
路径必须是绝对路径,如果 不存在,会自动创建对应目录 路径必须是 Dockerfile 所在路径的相对路径 如果是一个目录,只会复制目录下的内容,而目录本身则不会被复制
# COPY
COPY <src>... <dest>
COPY复制新文件或者目录从 ADD,唯一的不同是不能指定远程文件 URLS。
# ENTRYPOINT
- ENTRYPOINT [“executable”, “param1”, “param2”] (the preferred exec form,优先选择)
- ENTRYPOINT command param1 param2 (shell form)
配置容器启动后执行的命令,并且不可被 docker run 提供的参数覆盖,而CMD是可以被覆盖的。如果需要覆盖,则可以使用docker run --entrypoint选项。
每个 Dockerfile 中只能有一个ENTRYPOINT,当指定多个时,只有最后一个生效。
Exec form ENTRYPOINT 例子
通过ENTRYPOINT使用 exec form 方式设置稳定的默认命令和选项,而使用 CMD 添加默认之外经常被改动的选项。
FROM ubuntu
ENTRYPOINT ["top", "-b"]
CMD ["-c"]
2
3
通过 Dockerfile 使用ENTRYPOINT展示前台运行 Apache 服务
FROM debian:stable
RUN apt-get update && apt-get install -y --force-yes apache2
EXPOSE 80 443
VOLUME ["/var/www", "/var/log/apache2", "/etc/apache2"]
ENTRYPOINT ["/usr/sbin/apache2ctl", "-D", "FOREGROUND"]
2
3
4
5
# Shell form ENTRYPOINT 例子
这种方式会在/bin/sh -c中执行,会忽略任何CMD或者docker run命令行选项,为了确保docker stop能够停止长时间运行ENTRYPOINT的容器,确保执行的时候使用exec选项。
FROM ubuntu
ENTRYPOINT exec top -b
2
如果在ENTRYPOINT忘记使用exec选项,则可以使用CMD补上:
FROM ubuntu
ENTRYPOINT top -b
CMD --ignored-param1 # --ignored-param2 ... --ignored-param3 ... 依此类推
2
3
# VOLUME
VOLUME ["/data"]
创建一个可以从本地主机或其他容器挂载的挂载点,后续具体介绍。
# USER
USER daemon
指定运行容器时的用户名或UID,后续的RUN、CMD、ENTRYPOINT也会使用指定用户。
# WORKDIR
WORKDIR /path/to/workdir
为后续的RUN、CMD、ENTRYPOINT指令配置工作目录。可以使用多个WORKDIR指令,后续命令如果参数是相对路径,则会基于之前命令指定的路径。
WORKDIR /a
WORKDIR b
WORKDIR c
RUN pwd
2
3
4
最终路径是/a/b/c。
WORKDIR指令可以在ENV设置变量之后调用环境变量:
ENV DIRPATH /path
WORKDIR $DIRPATH/$DIRNAME
2
最终路径则为 /path/$DIRNAME。
# ONBUILD
ONBUILD [INSTRUCTION]
配置当所创建的镜像作为其它新创建镜像的基础镜像时,所执行的操作指令。
例如,Dockerfile 使用如下的内容创建了镜像 image-A:
[...]
ONBUILD ADD . /app/src
ONBUILD RUN /usr/local/bin/python-build --dir /app/src
[...]
2
3
4
如果基于 image-A 创建新的镜像时,新的 Dockerfile 中使用 FROM image-A 指定基础镜像时,会自动执行 ONBUILD 指令内容,等价于在后面添加了两条指令。
# Automatically run the following
ADD . /app/src
RUN /usr/local/bin/python-build --dir /app/src
2
3
使用ONBUILD指令的镜像,推荐在标签中注明,例如 ruby:1.9-onbuild。
# Dockerfile Examples
# Nginx
#
# VERSION               0.0.1

FROM      ubuntu
MAINTAINER Victor Vieux <victor@docker.com>

RUN apt-get update && apt-get install -y inotify-tools nginx apache2 openssh-server

# Firefox over VNC
#
# VERSION               0.3

FROM ubuntu

# Install vnc, xvfb in order to create a 'fake' display and firefox
RUN apt-get update && apt-get install -y x11vnc xvfb firefox
RUN mkdir ~/.vnc
# Setup a password
RUN x11vnc -storepasswd 1234 ~/.vnc/passwd
# Autostart firefox (might not be the best way, but it does the trick)
RUN bash -c 'echo "firefox" >> /.bashrc'

EXPOSE 5900
CMD    ["x11vnc", "-forever", "-usepw", "-create"]

# Multiple images example
#
# VERSION               0.1

FROM ubuntu
RUN echo foo > bar
# Will output something like ===> 907ad6c2736f

FROM ubuntu
RUN echo moo > oink
# Will output something like ===> 695d7793cbe4

# You᾿ll now have two images, 907ad6c2736f with /bar, and 695d7793cbe4 with
# /oink.
2
3
4
5
6
7
8
9
10
11
12
13
14
15
16
17
18
19
20
21
22
23
24
25
26
27
28
29
30
31
32
33
34
35
36
37
38
39
40
# docker build
docker build --help

Usage: docker build [OPTIONS] PATH | URL | -

Build a new image from the source code at PATH

  --force-rm=false     Always remove intermediate containers, even after unsuccessful builds # 移除过渡容器,即使构建失败
  --no-cache=false     Do not use cache when building the image                              # 不实用 cache
  -q, --quiet=false    Suppress the verbose output generated by the containers
  --rm=true            Remove intermediate containers after a successful build               # 构建成功后移除过渡层容器
  -t, --tag=""         Repository name (and optionally a tag) to be applied to the resulting image in case of success
2
3
4
5
6
7
8
9
10
11
参考文档:Dockerfile Reference (opens new window)
# dockerfile 最佳实践
# 使用.dockerignore文件
为了在docker build过程中更快上传和更加高效,应该使用一个.dockerignore文件用来排除构建镜像时不需要的文件或目录。例如,除非.git在构建过程中需要用到,否则你应该将它添加到.dockerignore文件中,这样可以节省很多时间。
# 避免安装不必要的软件包
为了降低复杂性、依赖性、文件大小以及构建时间,应该避免安装额外的或不必要的包。例如,不需要在一个数据库镜像中安装一个文本编辑器。
# 每个容器都跑一个进程
在大多数情况下,一个容器应该只单独跑一个程序。解耦应用到多个容器使其更容易横向扩展和重用。如果一个服务依赖另外一个服务,可以参考 Linking Containers Together。
# 最小化层
我们知道每执行一个指令,都会有一次镜像的提交,镜像是分层的结构,对于Dockerfile,应该找到可读性和最小化层之间的平衡。
# 多行参数排序
如果可能,通过字母顺序来排序,这样可以避免安装包的重复并且更容易更新列表,另外可读性也会更强,添加一个空行使用 \ 换行:
RUN apt-get update && apt-get install -y \
  bzr \
  cvs \
  git \
  mercurial \
  subversion
2
3
4
5
6
# 创建缓存
镜像构建过程中会按照Dockerfile的顺序依次执行,每执行一次指令 Docker 会寻找是否有存在的镜像缓存可复用,如果没有则创建新的镜像。如果不想使用缓存,则可以在docker build时添加--no-cache=true选项。
从基础镜像开始就已经在缓存中了,下一个指令会对比所有的子镜像寻找是否执行相同的指令,如果没有则缓存失效。在大多数情况下只对比Dockerfile指令和子镜像就足够了。ADD和COPY指令除外,执行ADD和COPY时存放到镜像的文件也是需要检查的,完成一个文件的校验之后再利用这个校验在缓存中查找,如果检测的文件改变则缓存失效。RUN apt-get -y update命令只检查命令是否匹配,如果匹配就不会再执行更新了。
为了有效地利用缓存,你需要保持你的 Dockerfile 一致,并且尽量在末尾修改。
# Dockerfile 指令
FROM: 只要可能就使用官方镜像库作为基础镜像RUN: 为保持可读性、方便理解、可维护性,把长或者复杂的 RUN 语句使用 \ 分隔符分成多行- 不建议
RUN apt-get update独立成行,否则如果后续包有更新,那么也不会再执行更新 - 避免使用
RUN apt-get upgrade或者dist-upgrade,很多必要的包在一个非 privileged 权限的容器里是无法升级的。如果知道某个包更新,使用apt-get install -y xxx - 标准写法
RUN apt-get update && apt-get install -y package-bar package-foo
- 不建议
例子:
RUN apt-get update && apt-get install -y \
    aufs-tools \
    automake \
    btrfs-tools \
    build-essential \
    curl \
    dpkg-sig \
    git \
    iptables \
    libapparmor-dev \
    libcap-dev \
    libsqlite3-dev \
    lxc=1.0* \
    mercurial \
    parallel \
    reprepro \
    ruby1.9.1 \
    ruby1.9.1-dev \
    s3cmd=1.1.0*
2
3
4
5
6
7
8
9
10
11
12
13
14
15
16
17
18
19
CMD: 推荐使用CMD [“executable”, “param1”, “param2”…]这种格式,CMD [“param”, “param”]则配合ENTRYPOINT使用
EXPOSE: Dockerfile 指定要公开的端口,使用 docker run 时指定映射到宿主机的端口即可
ENV: 为了使新的软件更容易运行,可以使用 ENV 更新 PATH 变量。如ENV PATH /usr/local/nginx/bin:$PATH确保CMD ["nginx"]即可运行
ENV 也可以这样定义变量:
ENV PG_MAJOR 9.3
ENV PG_VERSION 9.3.4
RUN curl -SL http://example.com/postgres-$PG_VERSION.tar.xz | tar -xJC /usr/src/postgress && …
ENV PATH /usr/local/postgres-$PG_MAJOR/bin:$PATH
2
3
4
ADDorCOPY:ADD比COPY多一些特性「tar 文件自动解包和支持远程 URL」,不推荐添加远程 URL
如不推荐这种方式:
ADD http://example.com/big.tar.xz /usr/src/things/
RUN tar -xJf /usr/src/things/big.tar.xz -C /usr/src/things
RUN make -C /usr/src/things all
2
3
推荐使用 curl 或者 wget 替换,使用如下方式:
RUN mkdir -p /usr/src/things \
    && curl -SL http://example.com/big.tar.gz \
    | tar -xJC /usr/src/things \
    && make -C /usr/src/things all
2
3
4
如果不需要添加 tar 文件,推荐使用COPY。
参考文档:
- Best practices for writing Dockerfiles (opens new window)
- Dockerfile最佳实践(一) (opens new window)
- Dockerfile最佳实践(二) (opens new window)
# 容器数据管理
docker管理数据的方式有两种:
- 数据卷
- 数据卷容器
# 数据卷
数据卷是一个或多个容器专门指定绕过Union File System的目录,为持续性或共享数据提供一些有用的功能:
- 数据卷可以在容器间共享和重用
- 数据卷数据改变是直接修改的
- 数据卷数据改变不会被包括在容器中
- 数据卷是持续性的,直到没有容器使用它们
添加一个数据卷
你可以使用 -v 选项添加一个数据卷,或者可以使用多次 -v 选项为一个 docker 容器运行挂载多个数据卷。
sudo docker run --name data -v /data -t -i ubuntu:14.04 /bin/bash
# 创建数据卷绑定到到新建容器,新建容器中会创建 /data 数据卷
bash-4.1# ls -ld /data/
drwxr-xr-x 2 root root 4096 Jul 23 06:59 /data/
bash-4.1# df -Th
Filesystem    Type    Size  Used Avail Use% Mounted on
... ...
              ext4     91G  4.6G   82G   6% /data
2
3
4
5
6
7
8
创建的数据卷可以通过docker inspect获取宿主机对应路径
sudo docker inspect data
... ...
    "Volumes": {
        "/data": "/var/lib/docker/vfs/dir/151de401d268226f96d824fdf444e77a4500aed74c495de5980c807a2ffb7ea9"
    }, # 可以看到创建的数据卷宿主机路径
... ...
2
3
4
5
6
或者直接指定获取
sudo docker inspect --format="{{ .Volumes }}" data
map[/data: /var/lib/docker/vfs/dir/151de401d268226f96d824fdf444e77a4500aed74c495de5980c807a2ffb7ea9]
2
挂载宿主机目录为一个数据卷
-v选项除了可以创建卷,也可以挂载当前主机的一个目录到容器中。
sudo docker run --name web -v /source/:/web -t -i ubuntu:14.04 /bin/bash
bash-4.1# ls -ld /web/
drwxr-xr-x 2 root root 4096 Jul 23 06:59 /web/
bash-4.1# df -Th
... ...
              ext4     91G  4.6G   82G   6% /web
bash-4.1# exit
2
3
4
5
6
7
默认挂载卷是可读写的,可以在挂载时指定只读
sudo docker run --rm --name test -v /source/:/test:ro -t -i ubuntu:14.04 /bin/bash
# 创建和挂载一个数据卷容器
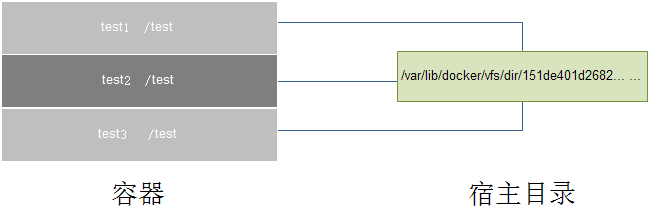
如果你有一些持久性的数据并且想在容器间共享,或者想用在非持久性的容器上,最好的方法是创建一个数据卷容器,然后从此容器上挂载数据。
创建数据卷容器
sudo docker run -t -i -d -v /test --name test ubuntu:14.04 echo hello
使用--volumes-from选项在另一个容器中挂载 /test 卷。不管 test 容器是否运行,其它容器都可以挂载该容器数据卷,当然如果只是单独的数据卷是没必要运行容器的。
sudo docker run -t -i -d --volumes-from test --name test1 ubuntu:14.04 /bin/bash
添加另一个容器
sudo docker run -t -i -d --volumes-from test --name test2 ubuntu:14.04 /bin/bash
也可以继承其它挂载有 /test 卷的容器
sudo docker run -t -i -d --volumes-from test1 --name test3 ubuntu:14.04 /bin/bash
# 备份、恢复或迁移数据卷
# 备份
sudo docker run --rm --volumes-from test -v $(pwd):/backup ubuntu:14.04 tar cvf /backup/test.tar /test
tar: Removing leading `/' from member names
/test/
/test/b
/test/d
/test/c
/test/a
2
3
4
5
6
7
启动一个新的容器并且从test容器中挂载卷,然后挂载当前目录到容器中为 backup,并备份test卷中所有的数据为test.tar,执行完成之后删除容器--rm,此时备份就在当前的目录下,名为 test.tar。
ls        # 宿主机当前目录下产生了 test 卷的备份文件 test.tar
test.tar
2
# 恢复
你可以恢复给同一个容器或者另外的容器,新建容器并解压备份文件到新的容器数据卷
sudo docker run -t -i -d -v /test --name test4 ubuntu:14.04  /bin/bash
sudo docker run --rm --volumes-from test4 -v $(pwd):/backup ubuntu:14.04 tar xvf /backup/test.tar -C /
# 恢复之前的文件到新建卷中,执行完后自动删除容器
test/
test/b
test/d
test/c
test/a
2
3
4
5
6
7
8
# 删除 Volumes
Volume 只有在下列情况下才能被删除:
docker rm -v删除容器时添加了-v选项docker run --rm运行容器时添加了--rm选项 否则,会在/var/lib/docker/vfs/dir目录中遗留很多不明目录。
参考文档:
Managing Data in Containers (opens new window) 深入理解Docker Volume(一) (opens new window) 深入理解Docker Volume(二) (opens new window)
# 链接容器
docker 允许把多个容器连接在一起,相互交互信息。docker 链接会创建一种容器父子级别的关系,其中父容器可以看到其子容器提供的信息。
# 容器命名
在创建容器时,如果不指定容器的名字,则默认会自动创建一个名字,这里推荐给容器命名:
- 1、给容器命名方便记忆,如命名运行 web 应用的容器为 web
- 2、为 docker 容器提供一个参考,允许方便其他容器调用,如把容器 web 链接到容器 db
可以通过--name选项给容器自定义命名:
sudo docker run -d -t -i --name test ubuntu:14.04 bash
sudo docker  inspect --format="{{ .Nmae }}" test
/test
2
3
注:容器名称必须唯一,即你只能命名一个叫
test的容器。如果你想复用容器名,则必须在创建新的容器前通过docker rm删除旧的容器或者创建容器时添加--rm选项。
# 链接容器
链接允许容器间安全通信,使用 --link 选项创建链接。
sudo docker run -d --name db training/postgres
基于 training/postgres 镜像创建一个名为 db 的容器,然后下面创建一个叫做 web 的容器,并且将它与 db 相互连接在一起
sudo docker run -d -P --name web --link db:db training/webapp python app.py
--link <name or id>:alias选项指定链接到的容器。
查看 web 容器的链接关系:
sudo docker inspect -f "{{ .HostConfig.Links }}" web
[/db:/web/db]
2
可以看到 web 容器被链接到 db 容器为/web/db,这允许 web 容器访问 db 容器的信息。
容器之间的链接实际做了什么?一个链接允许一个源容器提供信息访问给一个接收容器。在本例中,web 容器作为一个接收者,允许访问源容器 db 的相关服务信息。Docker 创建了一个安全隧道而不需要对外公开任何端口给外部容器,因此不需要在创建容器的时候添加-p或-P指定对外公开的端口,这也是链接容器的最大好处,本例为 PostgreSQL 数据库。
Docker 主要通过以下两个方式提供连接信息给接收容器:
- 环境变量
- 更新
/etc/hosts文件
# 环境变量
当两个容器链接,Docker 会在目标容器上设置一些环境变量,以获取源容器的相关信息。
首先,Docker 会在每个通过--link选项指定别名的目标容器上设置一个<alias>_NAME环境变量。如果一个名为 web 的容器通过--link db:webdb被链接到一个名为 db 的数据库容器,那么 web 容器上会设置一个环境变量为WEBDB_NAME=/web/webdb.
以之前的为例,Docker 还会设置端口变量:
sudo docker run --rm --name web2 --link db:db training/webapp env
. . .
DB_NAME=/web2/db
DB_PORT=tcp://172.17.0.5:5432
DB_PORT_5432_TCP=tcp://172.17.0.5:5432  # <name>_PORT_<port>_<protocol> 协议可以是 TCP 或 UDP
DB_PORT_5432_TCP_PROTO=tcp
DB_PORT_5432_TCP_PORT=5432
DB_PORT_5432_TCP_ADDR=172.17.0.5
. . .
2
3
4
5
6
7
8
9
注:这些环境变量只设置给容器中的第一个进程,类似一些守护进程 (如 sshd ) 当他们派生 shells 时会清除这些变量
更新/etc/hosts文件
除了环境变量,Docker 会在目标容器上添加相关主机条目到/etc/hosts中,上例中就是 web 容器。
sudo docker run -t -i --rm --link db:db training/webapp /bin/bash
root@aed84ee21bde:/opt/webapp# cat /etc/hosts
172.17.0.7  aed84ee21bde
. . .
172.17.0.5  db
2
3
4
5
/etc/host文件在源容器被重启之后会自动更新 IP 地址,而环境变量中的 IP 地址则不会自动更新的。
# 构建私有库
Docker 官方提供了 docker registry 的构建方法docker-registry (opens new window)
# 快速构建
快速构建 docker registry 通过以下两步:
- 安装 docker
- 运行 registry: docker run -p 5000:5000 registry
这种方法通过 Docker hub 使用官方镜像 official image from the Docker hub (opens new window)
# 不使用容器构建 registry
安装必要的软件
sudo apt-get install build-essential python-dev libevent-dev python-pip liblzma-dev
配置 docker-registry
sudo pip install docker-registry
或者 使用 github clone 手动安装
git clone https://github.com/dotcloud/docker-registry.git
cd docker-registry/
cp config/config_sample.yml config/config.yml
mkdir /data/registry -p
pip install .
2
3
4
5
运行
docker-registry
# 高级启动方式 「不推荐」
使用gunicorn控制:
gunicorn -c contrib/gunicorn_config.py docker_registry.wsgi:application
或者对外监听开放
gunicorn --access-logfile - --error-logfile - -k gevent -b 0.0.0.0:5000 -w 4 --max-requests 100 docker_registry.wsgi:application
# 提交指定容器到私有库
docker tag ubuntu:12.04 私有库IP:5000/ubuntu:12.04
docker push 私有库IP:5000/ubuntu
2
更多的配置选项推荐阅读官方文档: